
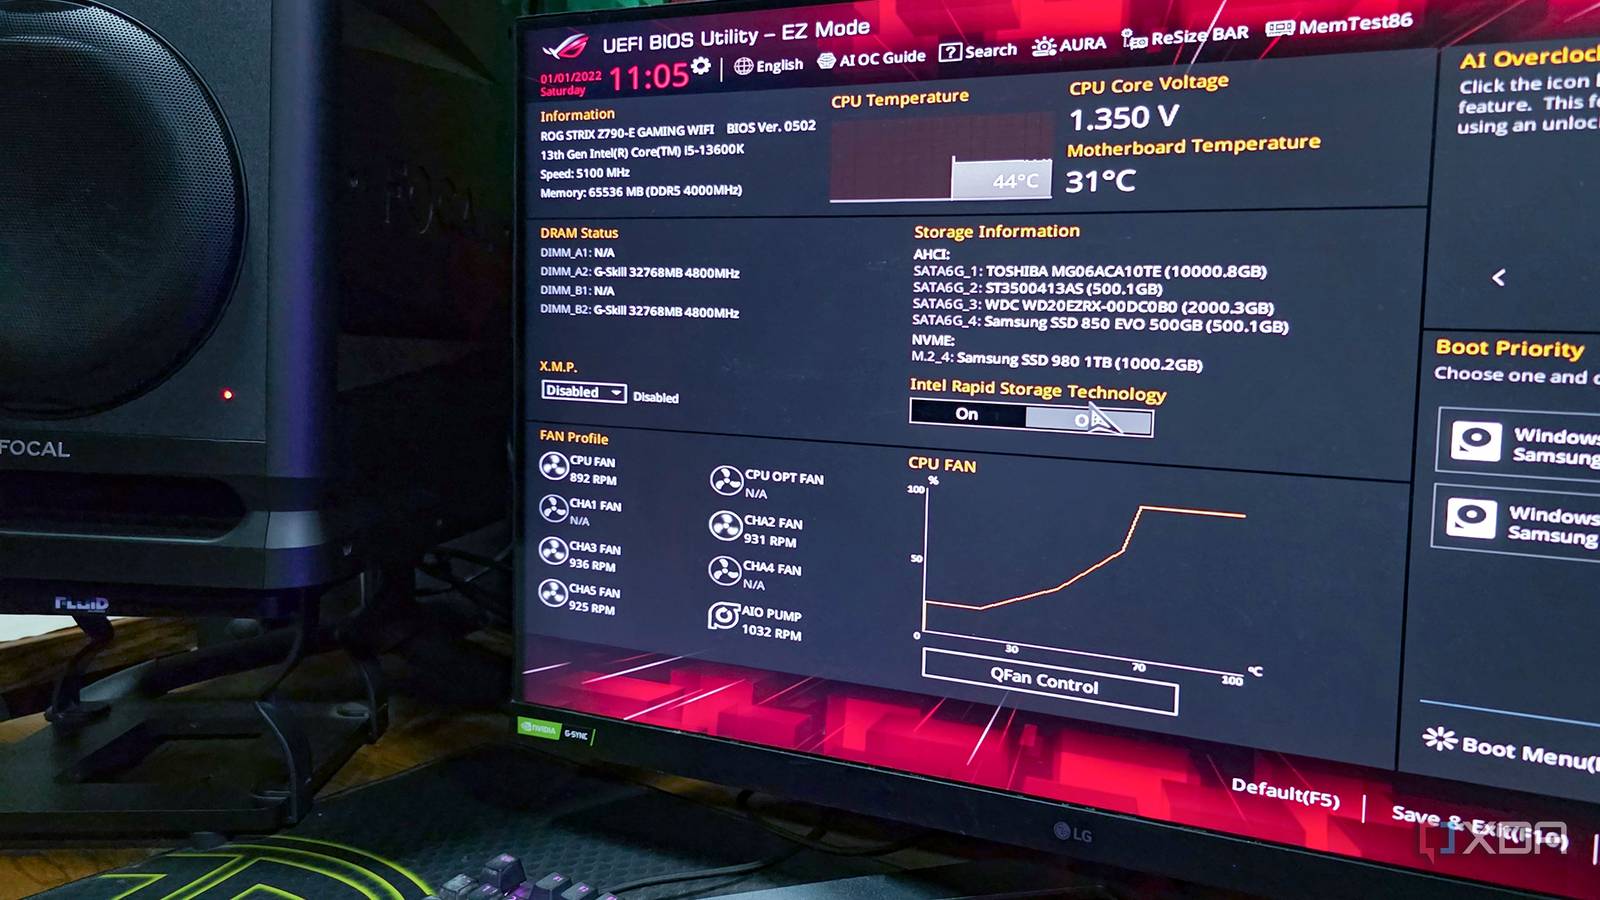
Building a PC can be a challenge, given how expensive components have become and the hassle of finding the right parts, assembling everything, cable management, and setting up Windows. But even after you've finished the DIY approach and booted into your operating system, you’re likely still missing out. I’ve built countless PCs over time, tuned and optimized them, and I’ve learned one thing: leaving everything, particularly within the motherboard’s BIOS, at default settings may do more harm than good. Taking control of these aspects can be a literal game changer when it comes to extracting maximum performance and efficiency from what you paid for. Why motherboards overcompensate on power Silicon lottery dictates the default BIOS settings Not every processor is created equal, and the same is true for any silicon component: CPUs, GPUs, SSDs, RAM. It's because of this “silicon lottery,” the natural variance in silicon quality, binning, and grading during manufacturing, that chips from the exact same wafer can have large variance in their power requirements. This is exactly why motherboard manufacturers have to guarantee that even the lowest-binned processor boots properly, hits its advertised clock speed, and stays 100% stable across the board. Which is why they program the BIOS to apply a generous amount of voltage. However, we don't know what kind of silicon we are getting until we boot it up, run some workloads, and test it. Take a flagship CPU like the infamous power-hungry Core i9 14900K, for example. In one instance, one sample of a 14900K might clock exceptionally well and easily hit 6 GHz under favorable circumstances; we call that a golden sample, but on that same motherboard, if you drop in a different 14900K, it might refuse to stay stable even at 5.9 GHz on all cores, with stock voltage and even with the E-cores shut off. The point is, the motherboard doesn’t know whether you have a golden sample or a dud; it recognizes the 14900K through the CPU’s register, then blasts both chips with maximum voltage just to be safe, and we all know how that went. Finding the ideal voltage floor required by any CPU Applying a negative offset helps stabilize power, thermals, and more Now, this may seem like an undervolting guide, but in reality, the concepts are related to undervolting, though they don't necessarily coincide. Right now, Intel processors are in a very weird situation when it comes to power management. Based on my tests across recent motherboard BIOS updates, the newer microcodes released to fix that oxidation problem have largely locked down the ability to apply a simple undervolt. Features like Current Excursion Protection (CEP) intentionally throttle performance if they detect the voltage dropping below the hardcoded factory curve. But there has always been a way: downgrading the BIOS so you can use the older 0x104 microcode properly and pull off a smooth negative offset without CEP. There is risk involved, but the thermal results can be pretty impressive. However, I have seen quite a few newly released or revised LGA 1700 motherboards, even premium Z-series boards, that no longer let you manually select a microcode version. On those locked-down boards, you're stuck tweaking only the basic offset values and hoping for the best. With that out of the way, here’s how I tested my processor’s behavior and monitored how my motherboard handled power delivery. On a side note, AMD (AM4/AM5) systems follow this exact concept too, though undervolting is much simpler thanks to tech like Precision Boost Overdrive (PBO) and the Curve Optimizer. Establishing the baseline, the crash point, and the sweet spot Testing voltage limits safely to eliminate thermal throttling Starting with my test setup, which comprises an Intel Core i5 13600K and an MSI B760M-A-DDR5 motherboard, my motherboard’s VRM isn't super fancy, and my CPU doesn't require much more. However, in stock settings, I did see thermal throttling during shader compilation or while playing games like Borderlands 4, which are incredibly CPU-demanding. To be fair, my CPU cooler isn't fancy either; it's a DeepCool AG300, and given its cooling capacity (165W), pairing it with a 13600K is ambitious, but that isn't the point. What I observed in this setup while playing games is that the CPU draws voltage close to 1.325V while maintaining 5.1 GHz. My other setup also has a 13600K paired with an ASUS ROG Z790E-Gaming, and there, in stock, that CPU reported 1.350 V. That's what threw me off. I bought a pair of 13600Ks because I knew how efficient they were, clock for clock, and both the Vcore results are something an average 14900K would use to hit 5.7-5.8 GHz all-core. But what's the point in pushing this much voltage for just 5.1 GHz? I thought my silicon was that bad, but the two CPUs did actually give me some ground to experiment with. Before I put in any numbers, there is a slight catch when tuning CPU voltage on motherboards that aren't Z-series. From my experience, B-series boards, like mine, operate dynamically and don't let you set a fixed voltage for the P-cores directly. That is why I had to opt for the No(UVP) or the 0x104 microcode and start with a -150 mV undervolt, which translates to 1.000V on the VID Vcore under automatic LLC settings. We can, however, set the voltage directly and even toggle CEP on Z790 boards. At 1.000V on the B760, with VID (Vcore) at 5.1 GHz, it instantly crashed on boot; then I bumped it to 1.050V, which booted but hard-locked in Windows. Then, I settled on 1,100 V, which booted fine but hard-locked during the Cinebench R23 stability test as well as OCCT. After that, I went to 1.150 volts, which ran through R23 and OCCT but crashed in certain games like Dota 2 and Counter-Strike 2, though it ran Borderlands 4 and other titles that rely heavily on multi-core usage. I won't get into super details here, but from my experience, I knew the automatic Load Line Calibration (LLC) was a factor and was causing crashes. Since my B760 motherboard doesn't have such a fancy VRM, the LLC settings make little sense beyond the 8 stages it provides. After a lot of trial and error, I managed to get the Vcore at a sweet spot of 1.250 volts at the stock 5.1 GHz; for LLC, I set it to stage 3, and guess what: the AG300 cooler handled the heat just fine. The temps don't cross 85 degrees, even with R23/OCCT running. No more thermal throttling whatsoever, given any workload. For gaming and other work, whatever I run, the CPU clocks stay pinned at 5.1 GHz, and thanks to the lower voltage, the motherboard's VRM also doesn't limit the CPU's clock speeds. MSI motherboards do this exact thing, which I did, and have a feature called CPU Lite Load. I haven't used that here because the implementation differs across boards, mainly due to the VRM and how they respond to LLC stages. Doesn’t intentionally crashing your PC cause permanent hardware damage? The actual risk of your system getting damaged is pretty low Tweaking BIOS power settings, undervolting, and playing with Load Line Calibration isn’t something you do every day unless you do it for a living. As for hardware damage, undervolting, in particular, cannot damage your hardware directly; if the voltage drops too low, the motherboard simply fails to power the chip, causing your PC to shut down abruptly. If you have an NVMe SSD as a boot drive, then with that sudden halt, do not worry. There is a very, very rare possibility, though I haven't encountered it yet, that the halt permanently corrupts your Windows installation or even takes down the SSD. The worst you can face, as it happened to me a couple of times, is a corrupted Windows boot manager, which is an easy fix via the bcdedit command. Taking control of your hardware is always worth the effort Finding your processor’s voltage saves you from the mercy of the auto settings My testing showed that the Core i5-13600K could maintain its expected clock speeds at a lower operating voltage, reducing temperatures enough to avoid the thermal throttling I had previously encountered. However, finding stable settings required repeated testing, and the results are specific to my processor, motherboard, and cooling setup. Undervolting can be a useful way to improve efficiency, but it isn't a guaranteed performance upgrade or a fix for degraded hardware. For most users, keeping the BIOS updated, using manufacturer-recommended settings, and ensuring adequate cooling should come first. Voltage tuning is worth exploring when there's a measurable problem to solve and enough time to test the results properly.
My motherboard was feeding my CPU too much voltage, and one BIOS tweak fixed it
Full Article
Original Source
Read the full article at Xda-developers →KhanList aggregates and links to publicly available news content. We do not host full articles from third-party sources. Always verify important information with original sources.