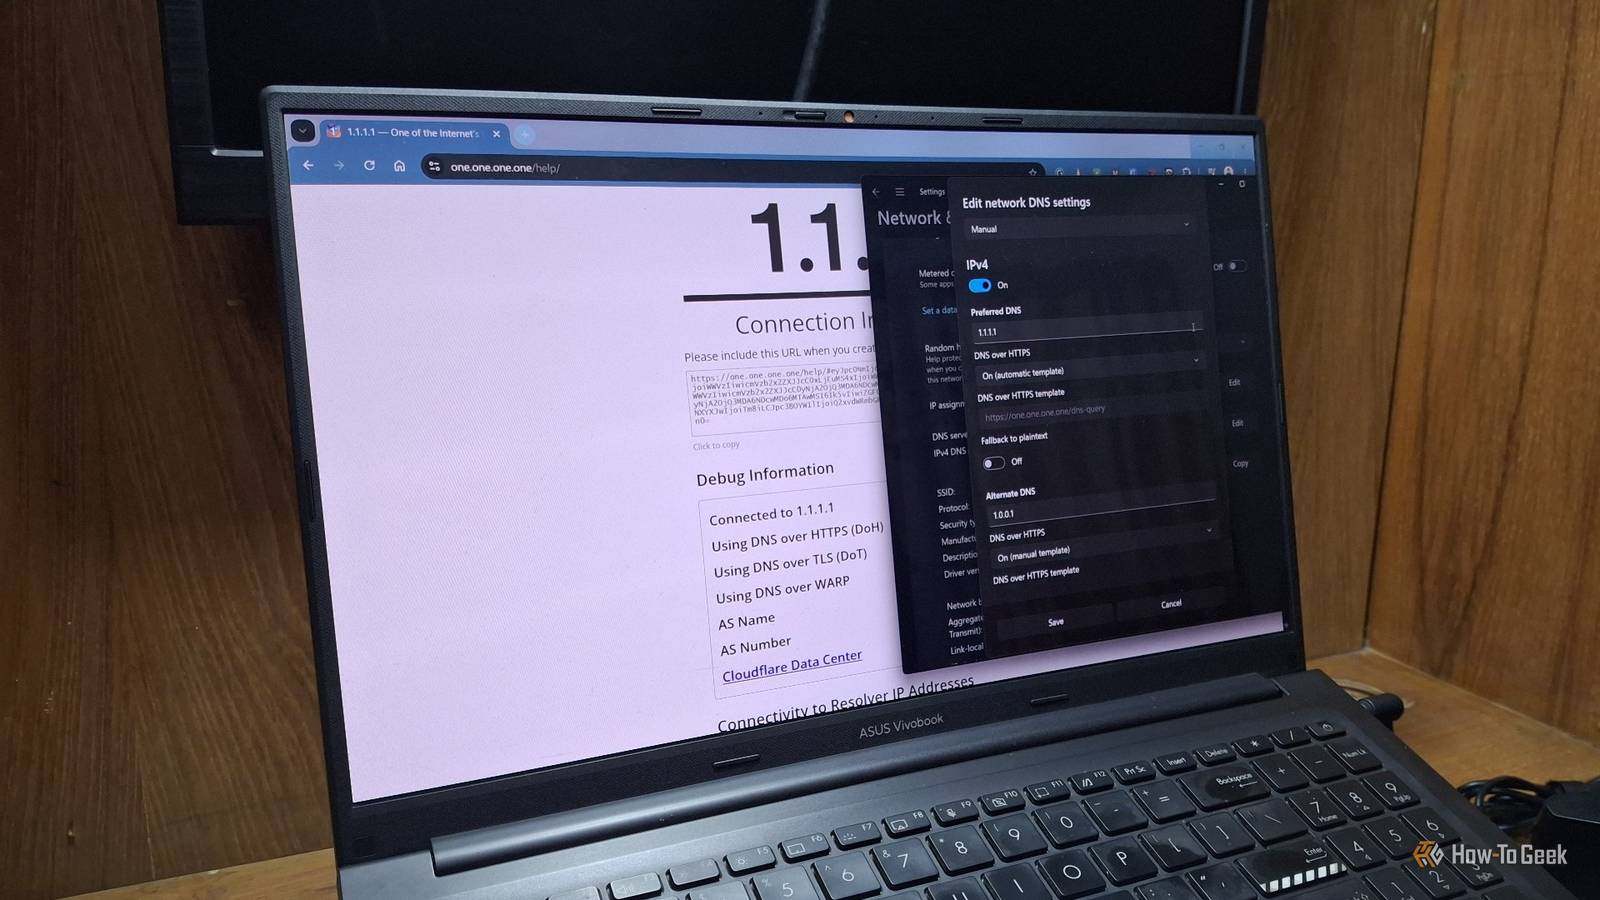
Published Jul 30, 2026, 2:30 PM EDT Zunaid Ali first became interested in technology after using a computer for the first time in 2006. He's been producing how-to content since 2018, reaching thousands of people in the process. As a kid, Zunaid used to read tech tutorials and troubleshooting guides on popular blogs. That made him want to start his own writing career. After the coronavirus pandemic, he finally decided to jump into the tech writing world. Before joining How-To Geek, he had written for HecticGeek, Distroid, and UbuntuPIT, among others. Zunaid first tried Linux when he wanted to learn Web Development in 2021. Due to his inexperience, he messed up his laptop trying to dual-boot Ubuntu with Windows. Frustrated, he went all-in with Linux and removed Windows completely. And that's when he fell in love with it. He's been actively experimenting with Linux since then. After finding his first writing gig on Linux in April 2022, he decided to specialize in it so he could share his knowledge and insights with fellow open-source enthusiasts. He joined How-To Geek in September 2023 and has been writing as a freelance contributor since then. Zunaid is currently pursuing his Bachelor's degree in Information & Communication Technology. When he's not writing, he's reading tech blogs, coding fun projects, or learning about new technologies. Other than Linux, he also has an interest in Android Development and Cybersecurity. He has experience in C/C++, Java, HTML/CSS/JavaScript, and Python. You can find some of his hobby projects on his GitHub. Every time you type a website into your browser, your ISP gets a free ticket to watch it. A few Windows 11 privacy settings get talked about a lot, but this one rarely does, even though it's been sitting inside your PC this whole time. It's not a third-party app, and you don't need to install anything new. You only need to know where to look, and honestly, most people never do. Your ISP can see every site you visit, and it's barely hiding it DNS requests still travel in plain text by default Credit: Lucas Gouveia/How-To Geek Picture asking a stranger for directions to a building before you walk inside. They won't know what you do once you're through the door, but they'll always know you asked, and exactly where you are headed. That's roughly what happens every time your PC loads a website. Before your browser can connect to anything, it first has to resolve the domain name into an address. That lookup traditionally goes out over port 53 with no encryption wrapped around it at all. It doesn't matter if the site itself loads behind a padlock and full HTTPS. The request asking where that site lives happens first, out in the open, on a completely separate channel from the secure connection that follows. Your provider isn't the only one who gets a look either. Anyone sharing your network segment, plus whatever router the request happens to pass through along the way, can read that same information. DNS over HTTPS is Windows 11's quiet fix for this It's built in, but Microsoft never turned it on for you Credit: Lucas Gouveia/Justin Duino/How-To Geek This is where DNS over HTTPS, or DoH, comes in. Instead of sending that lookup out in the open, it folds the request into the same kind of encrypted channel your browser already uses for HTTPS sites, sending it out over port 443 instead of port 53. From the outside, that traffic just blends into the pile of other encrypted connections your PC is already making. Nobody watching the wire can pick it out as a DNS lookup. One quick thing worth clearing up. DoH isn't a VPN, even though people sometimes lump the two together. It only encrypts the lookup step, not your actual browsing traffic afterward. If you want the fuller picture on what a VPN does and doesn't hide from your provider, you need to learn what your ISP still knows about you, even with a VPN. How to turn on DNS over HTTPS in Windows 11 It's a short, one-time setup in Settings It's really easy to switch this on. Open Settings, then head to Network & Internet. Click your active connection, either Wi-Fi or Ethernet. Find the DNS server assignment section and click Edit. Switch it from Automatic to Manual, then toggle IPv4 on. Type in a preferred and an alternate DNS server address. For Cloudflare, use 1.1.1.1 as preferred and 1.0.0.1 as alternate. For Google, use 8.8.8.8 and 8.8.4.4. For Quad9, use 9.9.9.9 and 149.112.112.112. Under each server, open the dropdown and pick On (Automatic Template). Click Save. That dropdown only shows up when Windows recognizes the provider as DoH capable, which currently covers Cloudflare, Google, and Quad9. Using a different provider like NextDNS still works, but you'll need to add its template through PowerShell first. Once you're done, it's worth checking that everything is actually working rather than just trusting the toggle. Cloudflare runs a simple browser test at 1.1.1.1/help that confirms whether your DNS queries are encrypted. What changes on your network once this is on Your browser might already have its own opinion Credit: Vivaldi Here's something that trips people up. Chrome, Firefox, and Edge all ship with their own secure DNS setting. If a browser's built-in setting is already turned on and pointed at a different provider than the one you picked at the OS level, that browser will keep using its own choice for its own traffic. Everything else on your PC, like background apps and other services, still follows the Windows-level setting you just configured. Nothing about this is broken. It's just two settings doing similar jobs in different places, so don't be surprised if you go check your browser later and find a different provider listed there. Two setups are worth double-checking before you roll this out everywhere. Split-tunnel VPNs sometimes let DNS traffic slip outside the tunnel entirely, since the VPN client and Windows can each assume the other one is handling it. And if your router or workplace network leans on filtering software that blocks certain sites by inspecting DNS traffic, that software typically depends on reading requests in the clear. Encrypt the lookup, and the filter has nothing left to inspect. It's also worth remembering this setting only covers the device you configured it on. Your smart TV, game console, or a family member's laptop on the same network is still sending its DNS requests the old way unless you repeat these steps on each device, or make the change at the router level instead. If a site suddenly refuses to load after you make this change, don't panic and assume your PC is broken. Head back into the same DNS settings and switch back to Automatic for a minute to confirm whether the new DNS provider is actually the cause. Nine times out of ten, that's all it takes to figure out what's going on. And if you want to keep tightening things up on your PC after this, there are many privacy features worth disabling on Windows 11. Never let your ISP know your business DNS over HTTPS won't make you invisible online, and it was never meant to. What it does is close off one of the quieter ways your browsing gets logged without you ever agreeing to it. Windows 11 has had this built in the whole time but never bothered to put it front and center.
Your ISP watches everything you do: Enable this Windows 11 setting to stop it
Full Article
Original Source
Read the full article at Howtogeek →KhanList aggregates and links to publicly available news content. We do not host full articles from third-party sources. Always verify important information with original sources.