
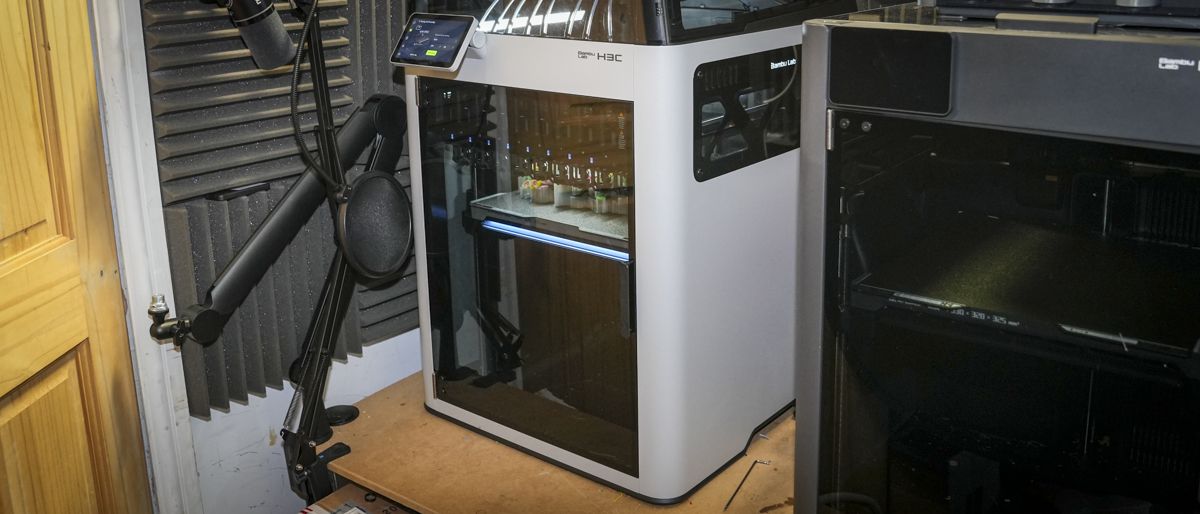
TechRadar Verdict Having had the H3C on the workbench for the last month, I still feel like I have only just scraped the surface of what’s possible. The big innovations here are the ability to print with different nozzle sizes, and while this still feels like a technology in development, the potential is obvious. However, as I built a pair of speakers with PLA outer walls and dampening TPU infill, the technical potential demonstrated the next step in 3D printing. Reasons to buy +Multi-material printing +Multi-diameter printing +Fast standard prints Reasons to avoid -Complex machine -Large and heavy -Software complexity takes some working out Why you can trust TechRadar We spend hours testing every product or service we review, so you can be sure you're buying the best. Find out more about how we test. It was inevitable that there would be a successor to the Bambu Lab H2C, which was no small machine; however, the Bambu Lab H3C takes scale and ability to the next level, although the innovative Vortek Hotend Change System is no more.Like the H2C, there’s the multi-tool functionality, but as you’ll see from the images, the system is all new, with dedicated tools in the Swaptek Tool Changer rather than the Vortek hotend-changing system, so something closer to the Bondtech INDX tool changers.An interesting update is the ability to print with different-sized nozzles, so a fine 0.2 mm for fine detail, going to a 0.8 mm for infill and areas where speed is preferable to fine finishes. What I have discovered through the month that I’ve had the printer so far is that this is an evolution of the 3D printing process, refining the techniques and while this technology and its application are still being ironed out, the full potential is apparent.Latest Videos FromTechRadarAdding to the multi-diameter printing is the advanced TPU handling. This essentially enables you to print with thicker 2.85 mm filament using the PrintTool hotend. As the filament is thicker, it supports softer TPU, and again, there’s a learning process behind its use. It’s not quite as simple as popping it in and letting it go, but it is a step in the right direction.Sitting on top of the machine is the new AMS 3H filament management system that holds up to nine filaments, with two slots enabling integrated drying and bypass feeds for specialist materials.I’ll admit, as the boxes kept arriving and the H3C started to take shape on the workbench, the machine did seem to dominate the space. However, after squeezing in the H2C next to it, while the new AMS gives a visual impression of scale, the footprint of the two machines is much the same.The big question for me at the start of this test was whether this new machine and design was a direct replacement for the H2C or something altogether new. It certainly initially looks far more complex, but then, as I became more familiar with the machine, the full tool changer design, once assembled, did seem, a little more simplistic and certainly more reliable as I pushed the print times and complexities.Are you a pro? Subscribe to our newsletterSign up to the TechRadar Pro newsletter to get all the top news, opinion, features and guidance your business needs to succeed!One point to note is that throughout the test, while I had the machine and seemingly every accessory that I could need to go with it, the actual official machine specifications and final tweaking of the software were still to be released.What Bambu did supply was a few test models and an extensive set of instructions about how to tackle each of the main new features. There was also a set of complex models that I used to start the test before deviating to some of my own, and then back to the supplied models to finish the test.I’ll cover more of those tests in the performance section, but what interested me was using this printer for a real practical task. This is, after all, a business-class machine, although the price will put this just in range of the keen enthusiast as well.The main project for this test was to print and build a set of speakers from Print Your Speakers, with the Supersonic MK3 kit fitting the bill for this test. Essentially, a solid PLA outer with TPU to add damping to the infill, and then a switch of nozzle sizes for the fine detail of the outer wall and a thicker nozzle for the inner walls.This is where the learning curve of this machine and the Bambu Lab software really comes into play, and while that learning curve is steep.As the test ran on, the potential of this machine started to grow. While multi-filament and tool changer machines now dominate and Bambu Lab’s lead in the field was quickly fading, especially with the Original Prusa CORE One INDX, of which the H3C’s new system bears more than a passing resemblance. But with support for 2.85 mm TPU and multiple other materials, it now pushes them back out in front and truly offers something unique, although there are still a few refinements needed.Bambu Lab H3C: Price and availabilityThe H3C will be available to purchase from the Bambu Lab website from 3 November 2026, following the official launch. Unlike the H2C, there is just one configuration available at launch, with the AMS 3H and all nine PrintTools included.H3C AMS Combo: $2,499 / £2,199Combo + PLA Palette + TPU: $2,589 /£2,269Combo + PLA Palette + TPU + Bambu Station (Enclosed) + E1 Air Purifier:$3,049 / £2,699Combo + PLA Palette + TPU + Bambu Station (Open): $2,799 / £2,469Bambu Lab H3C: Design (Image credit: Alastair Jennings)BambuLab H2C specificationsPrint Technology: Fused Filament Fabrication (FFF)Build Area: 330 × 320 × 325 mmMinimum Layer Resolution: To be confirmedMaximum Layer Resolution: To be confirmedDimensions: 493 × 571 × 587 mmWeight: 36.28 kg (including AMS 3H)Bed: Heated, up to 120°CPrint Surface: Textured PEI plateSoftware: Bambu StudioMaterials: PLA, PETG, TPU, ABS, ASA, PA, PC, PPA, PPS and other supported materialsPrint Speed: Maximum toolhead speed of 1,400 mm/sThe Bambu Lab H3C is a 3D printer on another scale, and whilst it doesn’t look that much larger than the H2C initially, once you start to work with it and try to move it around the workshop, you suddenly realise that its colossal 36.28 kg weight and physical dimensions of 493 × 571 × 587 mm make it more of a two-person lift than something you’re able to handle on your own.That would explain why Bambu Lab also sent a special trolley along with the machine, so it’s easy to access and move around the workshop. The issue at the moment is that there are so many 3D printers coming out that my workshop doesn’t have any space, so this will be something that I will manoeuvre the printer onto once I can find a pathway through the workshop to get the two sections to meet.As it was, I decided to set this machine up in the photo area, and I’ve already manoeuvred the H2C next to it so that I can do a side-by-side comparison on size and scale, however, again this left little room as the the scale of these machine is rapidly increasing.As I first lifted the H3C into position, the two machines looked roughly the same size, but as I started to add the huge new AMS 3H on top, I realised that this was an altogether different proposition.As I unpacked the machine, it was obvious that Bambu Lab had taken a completely different direction to multi tool head printing compared with the H2C, and the H3C has something more akin to the INDX tool changer. You can definitely see the similarities. As I went through the initial setup, what was surprising here was just how easy and straightforward it was, and whilst the machine was large, the actual placing of the AMS on top and positioning all of the nozzles wasn’t at all difficult.The only thing that you do need to make sure of is that there are nine tools included: eight with 0.4 mm PrintTools for 1.75 mm filament and one dedicated 0.4 mm PrintTool for 2.85 mm filament. Careful reference to the instructions as you’re setting up is essential to make sure that this nozzle goes in the right place.Before taking a closer look at this new system, it’s worth pointing out that the AMS 3H is quite an evolution on the AMS 2, sitting on top of the machine and really integrating more closely with the design compared with the add-on box of the AMS 2. This, I know, will please a lot of print farms, which, whilst generally fans of the Bambu Lab machines, find the AMS 2 is often a weak point and the part that they have to replace most often. One point here is that, of those nine slots, there’s a separate section within the rack which enables just two of those nine slots to be actively dried.As we’ve seen before, you can also add more AMS units, enabling up to 24-colour printing, up from the nine possible out of the box.Once I got everything set up and installed, which, to be honest, didn’t take too long, it was then time to connect the machine to the local network via Wi-Fi 6. As ever, this was as straightforward and simple as with all other Bambu Lab machines. One of the surprises is that a machine of this size and scale, especially aimed at the professional market, doesn’t feature an Ethernet port.The other point here is that as soon as it connected, it ran through a series of updates before then going through the calibration process. So, while the machine itself is really well designed and easy to set up, the software updating and full calibration process can take up to an hour, which is slightly infuriating when I was quite excited to see what this machine was capable of doing.After the Wi-Fi connection, calibration and everything else had been run through, it was time to connect through the Bambu Studio software, and again, a few clicks through the beta release that we were given, enabled me to connect quickly to the printer.However, as always, before running through my own prints and some of those others that had been supplied to fully test out this new machine’s abilities, I ran through the standard test prints on the machine. These are the usual 3D Benchy and variants, alongside scrapers and a few other bits and bobs, as expected. It ran through all of those prints flawlessly, and then it was time to cross over to Bambu Studio.Bambu Lab actually supplied some very interesting test models, which I go into in the performance section, but before I went into these multi-filament, multicolour designs, I decided to test out some of my more standard prints. This just enabled me to double-check the calibration and also try out a few different materials.There are two built-in 1080p cameras, with an optional Bird’s Eye camera available as well. The chamber heats up to 65°C, with a 120°C heated bed and a 350°C maximum nozzle temperature.Leaving the machine just to run through those few prints, I was able to step back and take a proper look at the machine, and it is an evolution of what we’ve seen with the other H series printers, just slightly larger. Again, this is a steel chassis, which gives it structural support and also makes it insanely heavy to lift around the workshop.The outer is plastic, with a grey and black exterior that looks stylish, just in the same vein as we’ve seen with the other Bambu Lab hardware. On the front, you’ve got a big viewing window so that you can see what’s going on with the print, and whilst the top-mounted AMS 3H does stop you from looking down into the machine, it's integrated rather than being a separate unit, which I personally really like.As we’ve seen before, there’s a really nice 5-inch colour touchscreen, with an 854 × 480 display resolution, and this is very responsive, giving me full access to all the functions and settings. However, it is getting more complex, especially with those nine toolheads. It does take a little bit of extra time just to orientate yourself with all of those different settings.Across the front is the main feature of this new 3D printer, obviously the new nine-toolhead rack, and what’s interesting here is that the rack raises and lowers, so if you do want to see what’s going on on the print bed, it’s far easier than with some of the other multiple systems of this style out there. At all times, however, you can see where the influence of the Prusa CORE One INDX version has influenced Bambu Lab’s slight change of direction, although they’ve taken that style of design in a slightly different direction.The rack features nine individual PrintTool docking positions, and these all automatically dock with tool alignment and offset compensation. What’s interesting here is that there are dedicated filament paths for each PrintTool, meaning that each works completely independently, and there are integrated filament cutters within the PrintTools, again just to help speed things up. When it comes to the extruder and internal mechanisms, they all use hardened steel, with hardened-steel extruder gears and nozzles rated at HRC 55+.As ever, we see a flexible steel build plate, and this is a decent size, with a 330 × 320 × 325 mm build volume enabling you to tackle all sorts of projects, especially with the huge material support this new printer offers.Bambu Lab H3C: Features (Image credit: Alastair Jennings)It’s difficult to do a quick run-through of the features because, over the H2C, things have really progressed, and the new Swaptek nine-tool changing system is a real evolution of design. You can’t help feeling it’s heavily influenced by the INDX system that we’ve seen from Bondtech and featured on the latest Prusa CORE One machines.However, over that system, there are plenty of changes, and it’s obviously got the Bambu Lab spin, with automatic tool changes that happen in under six seconds. There’s also active preheating that essentially anticipates the upcoming tool changes and heats the next nozzle in advance, making complex models slightly faster to print than on some of those other systems.One of the features that I noticed early on, and one of the issues with other systems of this style, is that quite often the tool rack gets in the way of being able to see the print area. However, once that new tool is selected, the tool rack actually retracts upwards so that you get a good clear view of the print area, and it also helps to keep the filament tubes out of the way.Feeding all of those nine new toolheads is the redesign of the AMS system, known as the AMS 3H, that manages the filaments in an integrated box that sits on top of the machine. Like the AMS 2, it's a sealed storage option and helps protect the filaments inside from moisture.Again, as we’ve seen in the past, it has automatic filament loading and routing that works exceptionally well, and with RFID built in, as long as you’re using Bambu Lab’s own materials, they’ll be automatically recognised and synced with the software, making the whole process that much easier.One of the surprises is that only two of those nine slots are actively dried, so if you do have filaments that are more prone to moisture than others, then they should sit in those two. There’s a cover that sits over the top, so it’s pretty easy to see which two those are.As ever, there are also expansion options, so if you have other AMS systems and you want to plug them in, the H3C supports additional AMS units for up to 24-colour printing.One of the new additions is the FlexFeed extruder that supports both 1.75 mm and 2.85 mm filament, and there’s also a dedicated 2.85 mm filament path for flexible materials such as TPU. While TPU for AMS can just be used directly on the machine, as I discovered when I printed speakers with files from Print Your Speakers, when it came to printing other softer TPU, you have to use one of the bypass feed ports and quickly change part of the installation and feed to the toolheads.The first time you do it, it takes a little bit of time and working out, but essentially, the soft TPU needs to go into one of the slots that enables active drying. TPU is hygroscopic and collects water like a sponge, so ensuring that it’s nice and dry before it goes through the system is just going to improve and help with the quality of the print.You then feed that through into the 2.85 mm supporting toolhead, but rather than running through the filament feed tube, you bypass the tube, cutting just a small length that goes into the toolhead and then directly into the extruder. This just helps with the smooth movement of the TPU filament through the system. This means that it can actually cope with TPU all the way down to 75A, perfect for some of the projects that Bambu Lab supplied.Using TPU in the system is not uncommon, but you still have to reconfigure the system slightly. Bambu Lab has made that slightly easier, and of course, you also have the ability to print with multiple materials and multiple colours.But what impressed me the most is that with the Bambu Lab PLA palette, which is a new range of filaments, you can print with CMYKW to enable colour mixing using cyan, magenta, yellow, black and white filaments. The end results, as you’re seeing in some of the sample pictures, are quite amazing, enabling far more colourful and complex prints than has previously been possible.But it’s not just about multiple colour-mixing filaments. You can also use a huge amount of engineering materials because of the hardened nozzles and the actively heated chamber, so utilising ABS, ASA, PA, PC and carbon-filled composites is all perfectly possible.Further supporting the flexibility over the way you print is that there are multiple nozzle sizes, including 0.2, 0.4, 0.6 and 0.8 mm. But what makes a difference here is that you can optimise it to work using those different nozzles in one print. That means you can speed up the printing of the interior support structure with, say, a 0.6 or 0.8 mm nozzle and get that fine-quality finish on the exterior with a 0.2 or 0.4 mm nozzle. This is something very new.There’s also been a range of feature enhancements for speed, with a maximum toolhead speed of 1,400 mm/s and acceleration of 25,000 mm/s². To keep up with that high-speed printing, the hotend flow rate of 40 mm³/s is also impressive, although these run to Bambu Lab’s own test conditions rather than what you’re actually going to see in the real world.Something which I haven’t really been able to look at in any depth is the CraftTool support, and we’re starting to see Bambu Lab not only promote their machines for 3D printing but for other craft uses. This is what really made the H2D such an interesting machine. Potentially, in the near future, the CraftTools will enable automatic switching between compatible printing and crafting tools, so there will be blade cutting, drawing and debossing, but I’ll bring you more on that when I’ve been able to look at it properly.As I mentioned in the Design section, Bambu Lab and, actually, quite a few of the other manufacturers are starting to take filtration seriously, and here we’ve got the H11 HEPA filter, granulated coconut-shell activated-carbon filter and an integrated chamber exhaust and circulation system. Bambu Lab actually even provided an air filter with the machine, which has been very handy, especially in quite a crowded workshop.When it comes to features, the H3C is one of the most feature-packed printers to have come onto the market yet, but with all of those features comes an added level of complexity that could cause issues in the long run, and the only way to discover those is to ensure that, over the month of having this machine, it has been running almost constantly.Bambu Lab H3C: Performance (Image credit: Alastair Jennings)As these 3D printers get more complex and the models that they’re able to produce become increasingly more elaborate, mixing not only colours but materials, the time it takes to fully test one of these machines is rapidly increasing.Thankfully, Bambu Lab recognises that whilst machines are speeding up, when it comes to fully testing some of those mixed-filament options, it doesn’t just take hours; it takes days for each print to be produced. In order for you to run through all of the test prints provided, including rerouting different filaments, that all takes a considerable amount of time.But thankfully, I’ve had this printer for almost six weeks, and through that time, there have only been brief periods where it has remained dormant. Otherwise, filament after filament has gone through, producing everything from pinhole cameras out of carbon-filled filament through to some quite incredible desktop speakers, thanks to the guys at printyourspeakers.com, and of course, the extremely elaborate models that the guys at Bambu Lab provided to test out this printer.Before I go into that, I’ll just quickly run through the setup process of the machine, as whilst this machine looks extremely complex, the actual setup process is typically Bambu. Essentially, with the machine arriving in two boxes, the machine and a separate box for the AMS, it only took about half an hour before the machine was sitting proudly on the workbench, looking ready to produce its first print.The instructions are pretty clearly laid out, and as you’d expect, the large 5-inch touchscreen gives you all the information you need. Once everything is plugged in and connected, you then simply load the filament, and it’s pretty much set to go. However, as always, that complexity comes with a large extra step.First, you download and install the firmware, which all ran through nice and quickly, but then it was on to the full setup calibration. Whilst it doesn’t actually take any involvement from yourself other than clicking a couple of buttons, it does take about an hour, and when you have a machine of this size and potential in front of you, that wait is slightly agonising but unfortunately essential.Once the machine had run through its copious amount of checks and all the nozzles had been calibrated, it was time to run through the first set of prints, and here I had three different options. Firstly, those pre-installed on the machine in the 64 GB internal storage; the second was my usual test prints; and the third was the additional files that Bambu Lab had provided to fully test out the system.I opted for the quick run of those prints in storage just to check whether the calibration had worked and everything was printing correctly, and sure enough, print after print came off the print bed without issue, mixing the colours beautifully into pretty good-quality standard prints. All of these that I started with initially were PLA and mainly ends of reels from previous reviews.Then it was on to my own test prints, and again, the accuracy and precision of the printer really stood out, and I was also impressed with the relative speed. One of the big points here is that the tool-changing system, as I saw with the INDX, vastly increases print speeds when compared with the H2C, which is a machine that I actively always have set up and running.The speeds with this new system are again slightly faster. A quick test of those print speeds on the H3C, printing the two-tone tree frog in large, took two hours and three minutes, with about eight minutes taken for the preparation time and the rest on the actual model printing. This compared with almost three hours on the H2C, and whilst it was far faster on the preparation and checks at just under six minutes, the print time was closer to two hours and 50 minutes. Finally, comparing it with the H2D, surprisingly, it put in a similar time to the H2C.As I ran through the test, the speed of the machine was the first thing that really stood out, and with a relatively large print bed as well, I was able to print large projects with absolute ease. Support structures went in nice and easily, and I always use PLA support, although as I started to venture into Bambu Lab’s own models, I realised the standard PLA support was just not delicate enough for what was needed, and PVA support, which could be washed away, would have been a better option.Through my own models, there were quite a few different projects that I wanted to really give a go. The first was a pinhole camera that I had designed for some lectures and was small. It's a good way to test out dimensional accuracy, as I had to drop in a brass-sheet pinhole lens that I had designed and make it tripod-mountable, with brass inserts used for the screw thread.As the box also had to be lightproof, dimensional accuracy due to the fitting and removing of a lightproof back was also essential, and using a carbon-filled filament with solid infill just ensured that the whole box would stay lightproof. I also had to feature a sliding shutter mechanism that would cover the brass aperture, so again, quality of surface printing as well as dimensional accuracy was absolutely essential.After running several iterations of the design, I came up with the final product and tested it in the studio with success, producing small prints onto photographic paper through a 0.3 mm aperture. The quality of the print and success of the project just highlighted the first bit of flexibility with this machine and its design.The next was to call on somebody with a lot more experience with high-quality and precision engineering 3D design, and the guys at Print Your Speakers provided me with the Supersonic MK3 desktop speaker kit to give this new printer a go. There were several angles that I wanted to fully test that no other printer would be able to do.The first was obviously to print speakers using PLA for the outer, but then rather than having PLA infill, I wanted it to be TPU in order to help absorb some of the sound. I also wanted to be able to swap between nozzle sizes, all of which took a little bit of experimentation, and at present this is an area of the systems use that I will have to come back to, as at the moment I haven't had any success. I then tested a straight PLA box against the PLA and TPU mixed box, and the difference in audio quality was apparent, with a far deeper sound from the more advanced material-mix option.Having now tried a variety of different materials and options through the machine, I was pretty confident about setting off with some of Bambu Lab’s own models to fully test out its abilities. The first was the FROSTSPINE Dragon Bust 1015, which used a variety of materials and took a while to organise the different materials that were needed into the AMS and configure the system.Printing this started to point out the big difference between the old Bambu Lab multi-filament AMS systems and this new iteration. It's far more complex, and along with the printing guides that helped guide you through the setup, there’s definitely a greater skill required to get the most out of this machine.It took two or three initial attempts before that model rattled off the print bed, taking several days to complete. I then moved on to the hummingbird frame, which was a simple multi-filament PLA mix, and here I really started to see the full potential, being able to mix the colours to create colours that weren’t directly available from a single filament but only once they were blended together, and the results were spectacular.The only thing was that I accidentally used PLA support rather than PVA support, so once the final model printed, which took several days, it was going to be a long process to break away all of that support. The intricacy and delicacy of many of the models that you’re now able to print on this machine far exceed what you’ve been able to do before.Through this whole process, the one thing that became apparent was that this is a far more hands-on machine, and there is an obvious learning curve, especially working with all the different toolheads, nozzle sizes, bypass filament feeds and potentially additional CraftTools. This is a very feature-enhanced workshop machine at a price that will appeal to both enthusiasts and professionals. (Image credit: Alastair Jennings)Bambu Lab H3C: Final verdict (Image credit: Alastair Jennings)In those six weeks of testing, I feel like I’ve only just started to scrape the surface of what’s possible, but there are several key points that I’ve learnt through this test. The first is that if you just want to get straight into printing, then there are cheaper machines out there which will enable you to do that. So if you only print with up to four filaments, which most people do, then the complexity of this machine might be just a little bit above what you need.But then, as you start to embrace all its options and capabilities, and if you’re willing to sit down and learn about how to mix materials, how to use those different nozzle sizes together and obviously all those different filament types, then you have a 3D printer that is really quite different from anything that’s come before and sets the tone for what’s coming up in the future.Whilst there are more than passing similarities with the INDX system, what Bambu Lab has done here is to evolve what it had done with its previous multi-filament systems and, with this new option, create something that is far more advanced.With that increasing complexity come its own issues, and through the process of this review, I did have occasions where I had to rerun the full calibration as one of the nozzles wasn’t quite sitting right. Then there’s the whole bypass reconfiguration of the filament feed, which does get quite complex, but once you’ve done it once, you basically allocate one toolhead to TPU, still leaving you with eight for all other filaments.The options and possibilities for this machine are huge, and through this review, I’ve just been incredibly impressed with the overall quality. Each firmware update has fixed some of the issues that I was having early on, such as the RFID not recognising filament reels and, for some reason, the auto-feed system suddenly not auto-feeding. But after the update, those issues were fixed.I also had, as you might be able to see on the speaker set, a slight issue with surface finish, but then that’s because I was experimenting with some of those more advanced features, and this was the first time that I had configured the whole process myself in the software. Later, small models printed with much better quality, but again, this is all part of that learning process. As it stands, this printer is a definite evolution of what’s possible and an exciting glimpse into the future of 3D printing.Buy it if...You want to print with multiple materials and nozzle sizes.The H3C enables you to combine different materials and nozzle diameters in a single print, something that would be difficult or impossible to produce on more standard 3D printers.You want faster, more efficient multicolour printing.With nine PrintTools and material changes taking under six seconds, the H3C reduces the time swapping filaments.Don't buy it if...You just want a straightforward 3D printer.The H3C has a steep learning curve, especially when mixing materials and nozzle sizes. For standard PLA printing, there are simpler, cheaper options.You have limited space or a tight budget.At £2,199 and over 36 kg, the H3C is a substantial investment unless you'll regularly use its advanced features.For more models, I've tested the best 3D printers you can get right now. Alastair is a photographer, filmmaker and tech writer who has been working in the publishing industry since the late 1990s. For more than 25 years he has covered photography, video and technology across Future's photography, technology and gaming brands. He runs a photography and video production company and lectures in TV and film. He can usually be found testing mini PCs or prototyping and prop building with the aid of 3D printing. You must confirm your public display name before commenting Please logout and then login again, you will then be prompted to enter your display name.
Bambu Lab H3C 3D printer review
Full Article
Original Source
Read the full article at Techradar →KhanList aggregates and links to publicly available news content. We do not host full articles from third-party sources. Always verify important information with original sources.