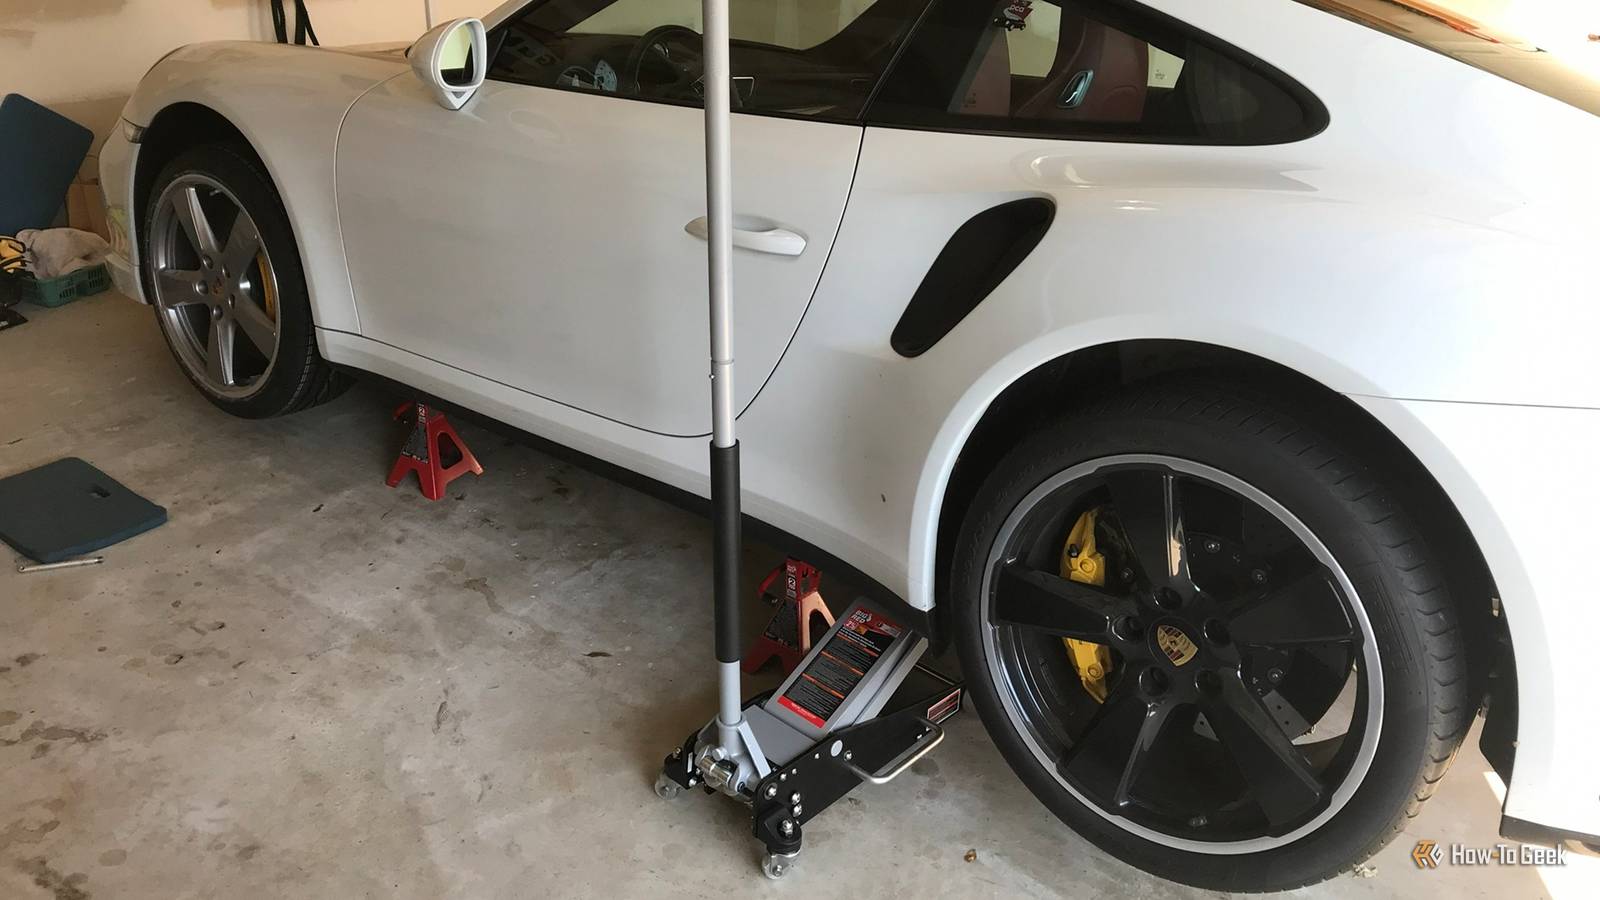
Published Jul 31, 2026, 8:00 AM EDT Joe Kucinski is an author at How-To Geek with a decade of automotive writing experience. As a former SCCA competition license holder, a certified high-performance driving instructor and Porsche Club of America regional officer, Joe brings a unique perspective to his automotive storytelling. Writing and driving are his main passions but he can also quote any movie from the 1980s and holds a black belt in various martial arts disciplines including Taekwondo, Hapkido and Okinawa-Te. Whether you're rotating your tires to extend their life, swapping between summer and winter wheel sets, or simply installing a different set of wheels to give your car a fresh look, no rule says you must pay a tire shop to do it. With a handful of basic tools and about an hour of free time, you can handle the job yourself and save the money of having it done at the dealer. You also don't need a dedicated garage. For years, I swapped my own summer and winter wheels while living in an apartment. I loaded the wheels onto a bellman’s cart, rolled them to the parking garage, and changed them right there. If you have a flat and level place to work safely, you have everything you need. Changing your own tires isn't difficult, but it does require doing things the right way. Using the proper lifting points, supporting the vehicle with jack stands, and tightening the lug nuts to the manufacturer's specifications are far more important than finishing quickly. Here's how to do the job safely. A $500 investment can save you thousands over time While you don't need a professional-level shop to rotate your own tires, you do need the right equipment. That equipment list includes a quality hydraulic floor jack and jack stands rated for your vehicle's weight. Add to that list a torque wrench, a lug wrench, the correct socket for your lug nuts, wheel chocks, and a tire pressure gauge. That might sound like a lot, but everything together can be had for around $500. If you switch between winter and summer wheels every year, these tools usually pay for themselves after only a couple of seasonal changes. And having quality tools makes the job easier and significantly safer than relying on the emergency scissor jack that came with your vehicle. Safety first Never trust the jack alone Credit: Joe Kucinski | How-to Geek Saving money is great, but not at the expense of your own safety. A hydraulic floor jack is designed to lift a vehicle. It is not designed to hold it in the air while you work underneath or remove wheels. Hydraulic seals can fail without warning, and even a small shift in the jack's position can cause the vehicle to fall. Once you've lifted your vehicle, always place jack stands under the manufacturer's recommended support points before removing a wheel. Lower the vehicle gently onto the stands and give it a slight push to confirm it's stable before you begin working. If you're only changing one wheel, keep the remaining wheels on the ground and use wheel chocks to prevent your car from rolling. It's a simple step that reduces the risk of injury. Modern vehicles aren't designed to be lifted just anywhere under the chassis. Your owner's manual identifies the factory jack points, which are reinforced areas specifically built to support the vehicle's weight. Lifting from the suspension components, floor pans, or other structural areas can damage the vehicle or, worse, cause it to slip off the jack. Take an extra minute to locate the correct lift points before you begin. A few tips that will save you time and trouble Enjoy a smoother tire rotation Credit: Joe Kucinski | How-to Geek One common mistake is raising your vehicle before trying to loosen stubborn lug nuts. I have swapped wheels on my cars well over 100 times by now. Yet every once in a while, I have the car in the air when I realize I forgot to loosen the lug nuts. Doh! Crack each lug nut loose while the tire is still firmly on the ground. You only need to loosen them about a quarter turn, but once the car is in the air, you are more likely to turn the wheel than actually loosen the nut if you skip this step. Once your vehicle is safely supported on jack stands, removing the lug nuts becomes quick and easy. If you're performing a tire rotation instead of swapping seasonal wheels, make sure you follow the rotation pattern recommended by your vehicle manufacturer. Many vehicles can use a traditional front-to-back or cross-pattern rotation, but directional tires can only rotate from front to rear on the same side of the vehicle. Vehicles with staggered wheel sizes often cannot be rotated at all. The owner's manual will tell you which rotation pattern is appropriate for your vehicle. Rotating your tires every 5,000 to 7,500 miles helps promote even tread wear and can extend tire life (and extending tire life is important when you consider a new set of tires can easily cost well over $1,000). If you regularly do other service work on your vehicle yourself, or want to start, you can perform your tire rotations with your oil changes. Since most cars today use synthetic oil, a typical change interval might be around the 5,000 to 7,500-mile mark, which is also a good time to rotate your tires. Credit: Joe Kucinski | How-to Geek Lug nuts need to be torqued to spec, not just until they are “tight enough.” And tightening too much isn’t advisable either. Over-tightened lug nuts can stretch wheel studs, damage brake rotors, and make roadside tire changes nearly impossible. That's why a torque wrench is one of the most important tools you'll own. After reinstalling the wheel, snug the lug nuts in a star pattern while the vehicle is still elevated. Once the vehicle is back on the ground, use a calibrated torque wrench to tighten each lug nut to the specification listed in your owner's manual. After driving approximately 50 to 100 miles, check the lug nut torque again. As the wheel settles against the hub, it's possible for the clamping force to change slightly. A quick re-torque ensures everything remains properly secured. As someone who has experienced a wheel coming off a car at speed, I can assure you that it is not a pleasant experience. Before you can consider the job complete, there is one last important check. Air pressure. Remember to use the pressure listed on the driver's door jamb or in the owner’s manual. The pressure written on the sidewall of the tire itself is the maximum pressure it can withstand, not what is recommended for your vehicle. Keep in mind that temperature changes can affect air pressure, especially when switching between summer and winter tires. If your budget allows, consider investing in a portable tire inflator in case you need to top off a low tire one morning. DIY is about more than saving money Rotating your own tires isn't just a way to avoid paying a shop for something you can easily do yourself. It also helps you become more familiar with your vehicle while ensuring one of its most important safety features receives the attention it deserves. As long as you use quality equipment, lift the vehicle correctly, support it with jack stands, and tighten everything to the proper torque specification, rotating your tires or swapping seasonal wheels is a straightforward job that almost anyone can learn.
I’ve changed and rotated my own tires 100+ times—here’s how to do it safely
Full Article
Original Source
Read the full article at Howtogeek →KhanList aggregates and links to publicly available news content. We do not host full articles from third-party sources. Always verify important information with original sources.