
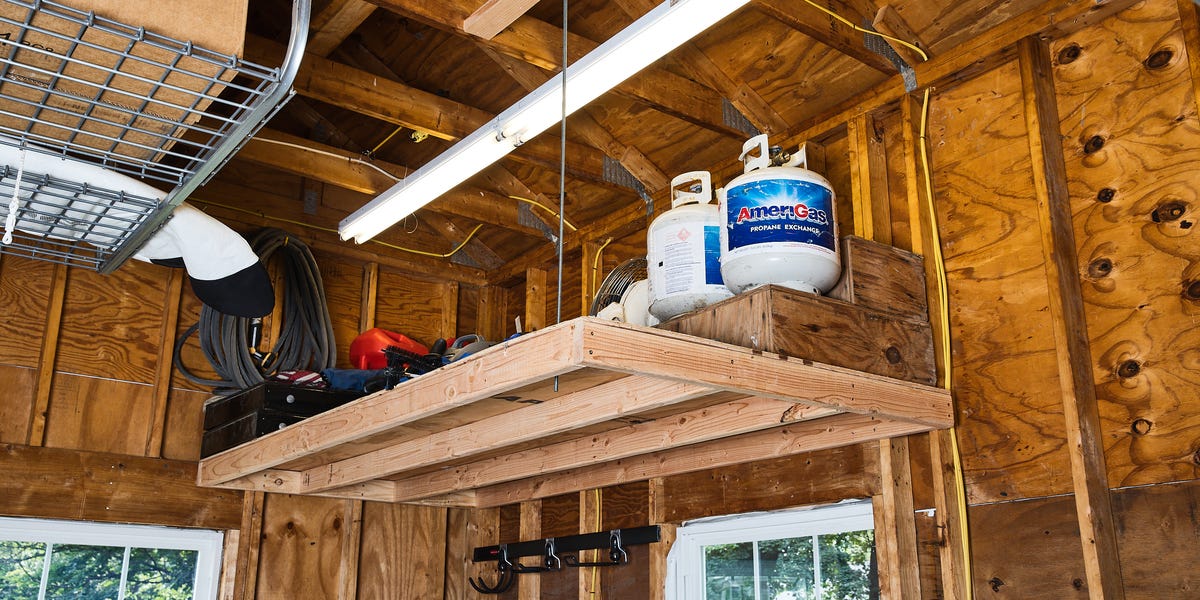
6 min readI think there comes a point in every relationship where your significant other politely (or otherwise) suggests that maybe your stuff has taken over the garage. In my case, she was absolutely right. Between mechanic’s tools, leaf blowers, pressure washers, and whatever I happened to be testing for Popular Mechanics at the time, the garage floor was slowly disappearing.I knew I wanted to build up instead of out. The problem was that most overhead storage lofts rely on bulky support posts that eat up the very floor space you’re trying to reclaim. They also tend to look like someone built a treehouse indoors when all is said and done. I wanted neither. And being that she’s Type A+ and I’m more of a Type B- guy, I knew she would never go for that look.Instead, I suspended a 4-by-8-foot platform 6.5 feet off the floor and simply screwed the platform into the existing wall studs at one corner of the garage. For the outside hanging corner of the platform, I installed a 6-foot threaded rod through wooden blocking I fastened between the ceiling rafters and fed it through a hole I drilled in the platform. After fixing the ceiling point of the threaded rod in place with nuts and washers, I leveled up the corner and secured it with nuts and washers to hold everything tight.The ProjectThis suspended storage loft is large enough to accommodate patio cushions, camping gear, beach chairs, and other bulky seasonal items that would otherwise eat up valuable floor space. I rested the entire platform on two ledger boards that I temporarily screwed into place before fastening the platform framing itself to the wall studs. You could easily leave the ledger boards in place for added support—useful if you intend to store heavier equipment overhead—but I chose to remove and repurpose them, most notably for the ceiling block that I ran the threaded rod through. The result is a surprisingly rigid platform that leaves the entire area below open for parking, storage, or workspace.The project requires only basic framing skills, common dimensional lumber, and a helper for the final lift into place. Once you install the ledger boards, you assemble the platform, lift it into position, fasten it, and level it using nuts and washers on the threaded rod.What You’ll NeedOne sheet of 4’x8’ by 5/8” plywoodSeven 2x4 studs, each 8 feet in length2-inch construction screws3-inch construction screwsOne 6-foot length of 1/2-inch threaded rod with four matching threaded rod nuts and washersStepladder (two are better)Tape measurePencilStud finderLevelMiter or circular sawCordless drill9/16-inch drill bit1/4-inch impact driverAngle grinder or hacksawHow to Do ItStep 1: Determine Placement I recommend setting the platform at least 6 feet off the garage floor to provide adequate headroom underneath. Starting at your chosen corner, use a stud finder to locate and mark the wall studs along both adjoining walls—at least 4 feet out along one wall and 8 feet along the other.Next, mark the height of the bottom of the platform on one wall. Using a level and pencil, extend that line to the corner and across the adjoining wall. This gives you a level reference line for positioning the platform along both walls.Trevor RaabTrevor RaabStep 2: Install a Ledger Board Using a miter or circular saw, cut the first of your studs directly in half, 48 inches apiece. These two pieces of lumber will act as a temporary ledger board for your platform to rest on prior to fastening. (You can either remove them after you install the platform or leave them up permanently for a bit of added weight-bearing.)Trevor RaabWith an impact driver, fasten one 4-foot ledger board along your reference line on the short wall by driving 3-inch construction screws into each available stud. Repeat with the other 48-inch piece to create a ledger on the adjoining wall. On the longer ledger, position the second piece of lumber closer to the outer end of the platform for better support.Step 3: Cut the LumberCut one 2x4 stud in half to create two 48-inch-long end pieces. Cut the remaining four studs to 93 inches long. Those longer pieces account for the thickness of the end pieces, giving you a finished platform that measures 48 by 96 inches once assembled.Trevor RaabA miter saw is the best option for clean, accurate cuts.💡 Tip: Dry-fit the pieces on the floor before driving any screws to confirm the finished dimensions.Step 4: Assemble the FrameLay the two 48-inch boards on edge, parallel to one another on a flat surface to form the ends of the platform. Position two of the 93-inch boards on edge between them to create the long sides of the rectangular frame.Trevor RaabAn open garage floor is the perfect surface for laying out the frame.Trevor RaabAn impact driver fitted with the proper star bit provides a fast, secure connection between framing members.Check the frame for square by measuring diagonally from corner to corner. When both diagonal measurements match, fasten the corners with 3-inch construction screws driven through the 48-inch end boards and into the ends of the 93-inch side rails.Step 5: Install the CrossmembersSpace the remaining two 93-inch boards evenly between the outside rails. These act as joists to stiffen the platform and fully support the plywood decking. Secure each crossmember with 3-inch construction screws driven through the outside rails.Trevor RaabStandard framing practice lands each member at 16 inches on-center relative to the others.Trevor RaabThe frame is ready for plywood.💡 Tip: Keeping the spacing consistent makes fastening the plywood much easier.Step 6: Attach the PlywoodLay the 4-by-8-foot sheet of 5/8-inch plywood on top of the frame, making sure all edges are flush. Fasten it with 2-inch construction screws every 8 to 12 inches around the perimeter and across each crossmember.Trevor RaabFlush up one corner edge and partially drive a 2-inch screw into the framing. Repeat at the opposite corner, and check that plywood and frame are flush throughout before driving the screws home.Trevor RaabUse a chalkline to determine where to drill screws into crossmembers.At this point, you'll have a rigid platform that's much easier to lift as a single assembly.Step 7: Raise the PlatformWith at least one helper, lift the platform into position. It may be helpful to have two stepladders in place to better balance the platform as you raise it.Rest the platform on the ledger boards and adjust to fit. Hold a light grip on the outer edge of the platform, as it will tend to sag.⚠️ Safety Note: A platform this size is heavy. Don’t attempt to lift or install it alone.Step 8: Permanently Secure the PlatformOnce the platform is resting in its final position, drive 3-inch construction screws through the frame into the wall studs around the perimeter. Have your helper slightly lift the outside corner to remove any sag while you tighten the fasteners.Trevor RaabDrive two construction screws through the platform framing into each available stud.To hold up the unsupported outer corner, drill a 9/16-inch hole through the plywood within 6 inches of the corner. Measure from each adjoining wall to the center of the hole. Transfer those same two measurements to the ceiling and mark (either on the drywall or, in the case of my unfinished garage, between parallel joists) where they intersect—this marks the location directly above the hole in the platform. This will be where you need to install ceiling blocking. Note: If you own a laser level, this is an ideal opportunity to use the vertical beam to align the hole in the platform with the destination in the ceiling.Step 9: Install Blocking in the CeilingTrevor RaabBe sure to thread the lower nut and washer onto the rod before you slide it through the drilled hole.Trevor RaabI opted for a nut and washer above the platform as well as below. Not totally necessary like it is at the blocking, but it stiffens the connection a bit.Install solid wood blocking between the ceiling joists in order to accommodate the upper portion of the threaded rod. (If your ceiling is drywall, you’ll need to cut away a square of it first. See how to do that below.) Using the marks you made as a reference, measure between the joists and cut a 2x4 to fit snugly between them. I repurposed one of the temporary ledger boards for this. Fit the blocking in place directly over the hole in the platform and drive two 3-inch construction screws through the ceiling joists and into the end of each side of the blocking.Step 10: Installing the Threaded RodOnce the blocking is in place, mark the exact measurements you recorded to the hole in the platform and transfer them to the lower face of the blocking. Drill a 9/16-inch hole through the blocking at the intersection of those measurements. Install a 1/2-inch threaded rod vertically through the hole in the platform and pass it through the blocking. Secure the rod to the blocking—one washer and nut above, one washer and nut below—in the ceiling. Tighten the hardware at the platform until it is level and fully supported. Cut away any excess threaded rod using either an angle grinder fitted with a metal cutting disc or a hacksaw.Trevor RaabFinish the platform in any way you see fit—drywall, trim, tongue-and-groove paneling, small lights—or leave it bare in the event you ever need to dismantle it.Trevor RaabThere’s still plenty of storage space for bikes, snowblowers, or seasonal furniture beneath.💡 What If You Have a Drywall Ceiling?If your garage ceiling is finished with drywall, you’ll need to use a standard drywall saw or oscillating multitool to cut out and temporarily remove a small section to access the ceiling joists. This allows you to securely fasten the short framing block between the joists in Step 9.Paul SmithBe sure to leave enough space in your drywall opening to allow for hand and wrench access to the threaded rod above the blocking.Use the removed drywall as a patch, then tape and finish with joint compound as needed. A finished garage ceiling may be part of the home’s required fire separation, so restore the drywall completely and seal any small openings after the hardware is installed.Paul Russell Smith is a former NYC ironworker turned screenwriter (Grace Point) and home renovation specialist. He lives in a crooked old farmhouse in Stockton, NJ, where he’s just as likely to be clearing a clogged pipe as rewriting a third act. When he’s not working, he enjoys hiking, pedestrian beer, and cooking over a live fire. His self-proclaimed spirit animal is the English Bulldog.Will Egensteiner has been reviewing products for 10 years, testing and writing about everything from climbing gear to video game consoles to cars. He began his career as an intern at Popular Mechanics, then worked as an editor at Outside, spearheading the magazine's gear coverage and biannual Buyer's Guide. Now that he's back, he leads product reviews for PopMech, as well as Runner's World, Best Products, and Biography. His favorite stuff to review is still outdoors equipment, and he can tell you from memory what ePTFE stands for.
Build a Suspended Storage Platform and Free Up Your Garage Floor
Full Article
Original Source
Read the full article at Popularmechanics →KhanList aggregates and links to publicly available news content. We do not host full articles from third-party sources. Always verify important information with original sources.