
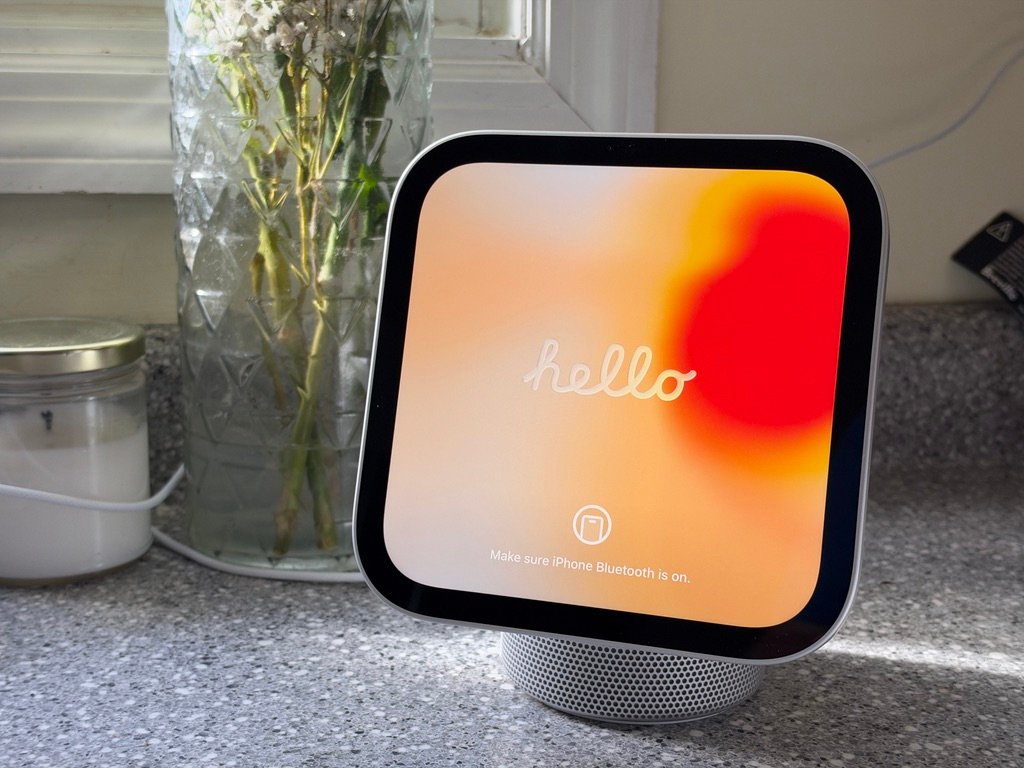
Stan Horaczek We may earn revenue from the products available on this page and participate in affiliate programs. Learn more › Apple’s $299 smart display has been sitting on my kitchen counter for about a week. It looks like a hybrid between an old-school iMac and a giant Apple Watch, but it’s a dedicated home for the recently revamped Siri. It’s an easy addition for anyone already committed to Apple gear. If your smart home runs on cameras, locks, or sensors that don’t work with Apple Home, though, you’ll want an upgrade plan before you buy one. The HomeView comes in two versions, and both cost $299 in the US. I tested the tabletop model, which mounts a 7-inch square touchscreen on a domed aluminum speaker base and includes a 30W power adapter and USB-C cable in the box. You can have it in any color you want, as long as it’s silver, starlight, rose pink, or space gray. The Apple HomeView (Wall Mounted) drops the base and its extra speaker hardware, as well as the starlight/rose pink color options, and the panel costs more to put on a wall than its $299 sticker price suggests. It requires a Schneider Home mount sold separately, and those start at $59.95. The cheapest USB-C mount also needs a power adapter of at least 20W, which you’ll have to supply yourself. See It The Apple HomeView’s design and setup The HomeView looks the way you’d expect an Apple product to look. Once you take off the protective coverings, it’s pretty out of the box. And it looks great between a breadbox and a butcher’s block, especially compared to an older smart screen that I’ve had there for years, which looks ancient next to it. A stainless steel hinge connects the screen to the base, so you can tilt the display toward wherever you’re standing. The screen stays firmly in place after you position it, even if you tap aggressively like I tend to. It doesn’t wobble or shake as you navigate on-screen menus. Stan Horaczek Setting up the HomeView feels like setting up an iPhone or any other recent Apple device. It requires an iPhone running iOS 27.2 or later (or an iPad on iPadOS 27.2), so if your phone isn’t there yet, like mine wasn’t, you’ve got to stop and run the update first. The HomeView played a soft, heavenly drone the whole time it waited, which is a much nicer way to sit through a software update than staring at a progress bar. Also, when you first boot things up, you might think you can immediately start asking for the kind of stuff you ask Siri on your iPhone, but you may have to go through a round or two of launching apps on the HomeView to give them permission to access your account even if your iPhone is with you. A display that knows when to back off The HomeView’s screen has looked great in every lighting condition I’ve put it in. Apple rates its brightness between 0.3 and 500 nits, and that bottom end is what makes it work on a nightstand. In a dark kitchen, it reads as a soft glow instead of a floodlight. The touchscreen responds quickly, and it kept registering taps even when my fingers were slightly wet (even though the device doesn’t have a specific water-resistance rating). That’s a real advantage for a screen that spends its life in a kitchen. Siri AI and the iPhone question The new Siri AI on the HomeView is a big jump from the old Siri. When a paired Apple Intelligence-enabled iPhone is nearby, it can pull from personal data. If you ask about an upcoming concert, it can also check the calendar on your Apple account and tell whether you’re actually free to go. That personal access runs through the HomeView’s camera. It can recognize up to six Home app-registered household members by face, and it only shows someone’s personal information when it recognizes that person and their paired iPhone or iPad is on the same Wi-Fi network and was recently unlocked. The HomeView’s A18 chip uses what Apple calls Secure Exclaves to process the camera and microphone feeds in a separate compartment, and Apple says neither the operating system nor Apple itself can access it. Those safeguards are reassuring on paper, though they aren’t something I could independently verify while testing a smart display in my kitchen. That reliance on a nearby iPhone or iPad is also the source of the HomeView’s most frustrating quirk. With my phone on me, Siri sometimes can’t decide which device should answer. The first few times I tried to set a simple timer, it turned into a dance between the HomeView and my phone before one of them finally took the request. It takes a little getting used to. Your iPhone also supplies a big share of the HomeView’s apps. There’s no App Store on the device. It ships with 15 built-in apps, including Safari, FaceTime, Music, and Home, and it pulls a handful of other Apple apps, like TV and News, from your phone. So, if you don’t mind some severe letterboxing, you can watch TV and movies on there. Supported third-party audio and video apps show up from a paired iPhone, too, through a system that works a lot like CarPlay. If a service you rely on doesn’t support it, there’s no way to install it on the HomeView directly. How the HomeView works as a smart home hub The HomeView’s main job is running your smart home, and that’s where my experience was most mixed. It controls accessories you’ve added to Apple Home, which includes supported HomeKit and Matter devices. My Ring cameras don’t integrate with Apple Home natively, so they never appeared in the HomeView’s Home Camera face, which can otherwise show up to nine live feeds at once. It worked easily with my smart lighting and other natively compatible devices. Check whether your current cameras, locks, sensors, and thermostat show up in Apple Home before you plan to run the whole house from this screen. If they don’t, budget for HomeKit or Matter replacements that do (and Apple has a whole suite of new options developed alongside LG and Schneider). The actual smart hub interface that displays on screen is handy for keeping tabs on what’s going on in your home. It’s important to note that this thing looks like a thermostat when it’s on the wall, but it isn’t one. Maybe a future model with a built-in thermostat could free up some wall space. Cooking mode and sound quality The HomeView turned out to be a great cooking assistant. Once you open a recipe page on the web, either on your iPhone or in Safari on the HomeView, a Start Cooking button reformats it so you can follow the steps in real time while you work. Recipe pages vary wildly in how they’re formatted and coded, and I expected that mess to trip it up. It has worked without a problem every time I’ve used it so far. I made a fairly simple recipe for peanut butter noodles, and the instructions and timers were helpful and easy to use. More complicated recipes are more of a challenge, especially since you can’t really perform more than one step at a time, so don’t expect it to turn you into Gordon Ramsay overnight. As for the audio, the tabletop HomeView sounds full for its size. Its base holds a down-firing woofer and two force-canceling passive radiators, almost like a subwoofer in miniature (but without the extension), and the display adds two custom full-range down-firing drivers of its own. I’d been using an older Google smart display before this, and the jump in sound quality is obvious. In separate tests, PopSci editor Tony Ware spent a couple of nights with his own HomeView and some of his favorite songs and came away with some positive impressions. Compared to a HomePod mini, the beat hits more convincingly. While there’s not much room for excursion in the base, output manages to be surprisingly potent without sacrificing clarity. It won’t beat some recent whole-home audio-focused connected speakers (or Apple’s own full-sized 2nd-gen. HomePod, for that matter), but it’s plenty room-filling for such a compact, multipurpose enclosure. Whether you’re chopping carrots or choppin’ it up with friends, the HomeView is more than enough speaker for a smaller space. What was more impressive was the airy, open presence of Dolby Atmos tracks from Apple Music, given the use of reflections and computational audio rather than an actual array of directional drivers. With accelerometers and Apple silicon adjusting the acoustic system’s EQ and output based on the screen’s tilt, the result is more incisive than immersive … how it will always be when you can’t surround yourself with speakers. Still, it projects clearly without sounding overly bright or edgy, which is good for podcasts to playlists. There are occasional kinks, however. If you’re into spatial audio, the best way to ensure you’re getting the correct version of a track is to ask the HomeView to pull Apple Music directly from the cloud; sometimes the Dolby Atmos badge won’t pop up when you send a track from your phone over AirPlay, so you can’t be certain it’s not just stereo. Alternatively, you can hand off whatever is playing on your phone by bringing it close enough to the HomeView to get an AirDrop ripple animation and the album art to show up. Also, you might find yourself instinctively running your finger along the edge of the display looking for volume buttons, but there are no physical controls, which isn’t surprising from an aesthetic standpoint but still feels like a shortcoming. So, who should buy the Apple HomeView? The HomeView makes the most sense on a nightstand, on the wall next to your thermostat, or in the kitchen. Its Photos face turns it into a digital picture frame, which keeps it from looking like a giant Apple Watch stuck to your wall or sitting on your table (though the watch faces are cute and colorful). If your home already runs on an iPhone and Apple Home accessories, HomeView slots right in and puts it all on one screen you’ll actually want to look at. If you’ve built your smart home around gear that doesn’t work with Apple Home, however, plan to replace it before you make the jump. 2026 Popular Science Home of the Future Awards 39 products that will improve your everyday life.
Apple HomeView smart home hub review: Siri gets a swanky new house
Full Article
Original Source
Read the full article at Popsci →KhanList aggregates and links to publicly available news content. We do not host full articles from third-party sources. Always verify important information with original sources.