
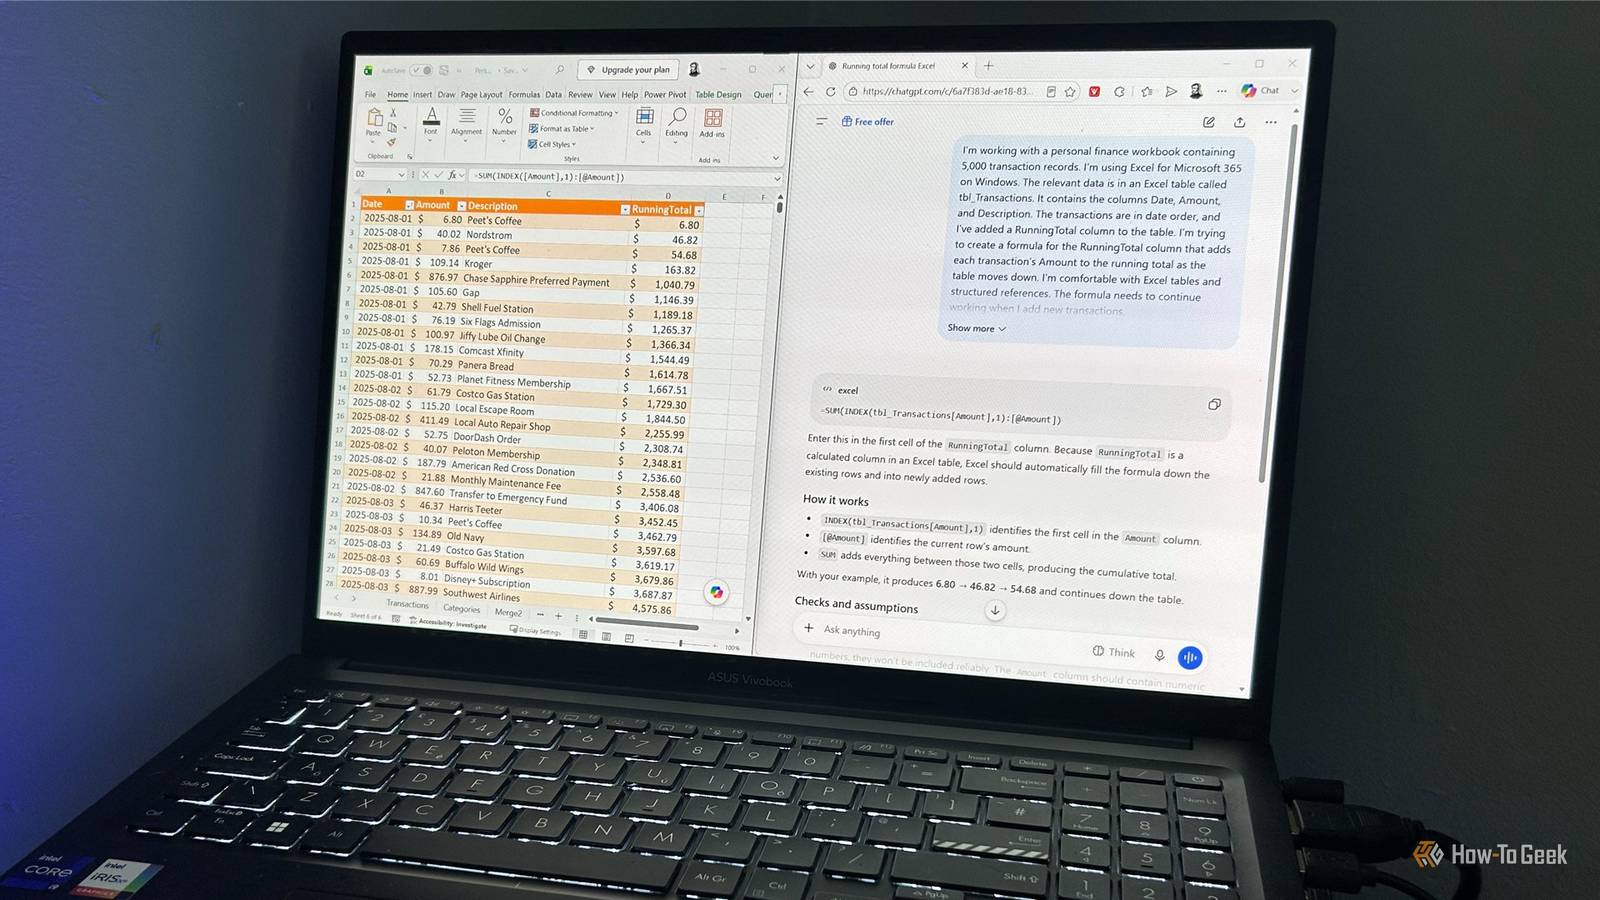
Published Aug 21, 2026, 6:30 AM EDT Tony Phillips is an experienced Microsoft Office user with a dual-honors degree in Linguistics and Hispanic Studies. Prior to starting with How-to Geek in January 2024, he worked as a document producer, data manager, and content creator for over ten years, and loves making spreadsheets and documents in his spare time. Tony is also an academic proofreader, experienced in reading, editing, and formatting over 3 million words of personal statements, resumes, reference letters, research proposals, and dissertations. Before joining How-To Geek, Tony formatted and wrote documents for legal firms, including contracts, Wills, and Powers of Attorney. Tony is obsessed with Microsoft Office! He will find any reason to create a spreadsheet, exploring ways to add complex formulas and discover new ways to make data tick. He also takes pride in producing Word documents that look the part. He has worked as a data manager in a secondary school in the UK and has years of experience in the classroom with Microsoft PowerPoint. He loves to encounter problems in Microsoft Office and use his expertise and legal-level training to find solutions. Outside of the Microsoft world, Tony is a keen dog owner and lover, football fan, astrophotographer, gardener, and golfer. I've recently spent a lot of time testing ChatGPT, Gemini, Claude, and other AI tools with Excel, and one thing stands out: the more relevant detail you give them, the less time you spend correcting their answers. But creating a good AI prompt can take longer than doing the Excel task yourself, and that kind of defeats the point. So, to save you the bother, I've broken down the key parts of a useful Excel prompt so you can build one without starting from scratch. Think of these as building blocks rather than seven rules. Copy and paste each section, fill in the details to match your scenario, and combine them into a single prompt. You won't always need every part, and you can adapt them depending on your workbook. For the screenshots, I'll use a simple real-world ChatGPT example to demonstrate what these prompts can look like when they're filled in. Step 1: Give AI the context it needs More context usually means fewer corrections later How much detail you need depends partly on the model you're using and how you're interacting with it. Copilot in Excel can work with the workbook you're using, while general-purpose chatbots might need you to describe the data or upload the file. Even when AI can see my workbook, I still give it the full picture. A workbook shows AI what is there, but not necessarily why I've built it that way or what I'm trying to achieve. I also tend not to upload my own workbooks if possible, both for privacy and because more data doesn't automatically mean a better answer. If you do upload a workbook containing sensitive information, either remove it or replace it with dummy data before uploading. This is how I usually begin my prompt: I'm working with [describe the workbook and what it's used for]. I'm using [Excel version] on [Windows/Mac]. The relevant data is on [worksheet name] in [table/range name]. It contains [briefly describe the columns, data, or structure]. I'm trying to [describe the problem or what you want to achieve]. I'm comfortable with [describe your Excel skill level or relevant features]. [Add any important details, restrictions, or things you've already tried.] Step 2: Tell AI exactly what you want A vague request leaves too much room for assumptions Once AI understands your workbook, the next part explains the specific job you want it to perform. Avoid phrases like "make this better" or "fix my spreadsheet." Instead, describe the actual outcome. If there are several possible solutions, explain what matters most. Maybe you want an easy-to-understand formula, a solution that works with thousands of rows, or something that carries on working when you add more data. This is what I add next: Your task is to [describe the specific Excel task or problem]. I want the result to [describe exactly what you want to happen]. You can also narrow the type of solution you want: Prefer a formula-based solution rather than VBA. Keep the solution as simple as possible while maintaining the required functionality and compatibility with my version of Excel. Step 3: Add some guardrails Tell AI what it should and shouldn't do AI will happily suggest a solution that works in isolation but doesn't fit the rest of your workbook. This is where telling AI what not to do (negative prompting) can be useful. Something like this will usually do: The solution must [requirement]. Do not [things you don't want]. Use [preferred function or feature] where appropriate. Step 4: Show AI what you mean Examples can be clearer than explanations If the result needs to follow a particular format or pattern, give AI examples. This is sometimes called few-shot prompting: you give AI one or two examples to show it what a successful result should look like: For example, if [describe an example input], I expect the [result] to be [describe or show the expected output]. Follow this same pattern for the remaining data. Step 5: Tell AI how to handle uncertainty Make it ask before making assumptions One of my biggest frustrations with AI and Excel is how it handles ambiguous situations. Unless you tell it otherwise, AI can make a perfectly reasonable assumption that turns out to be completely wrong for your situation. So, add something like this to the prompt: If you need information that I've not provided, ask me a follow-up question before making an assumption. If there are multiple valid approaches, briefly explain the differences and recommend the one that best fits my requirements. Step 6: Specify the output Get the answer in a format you can actually use Even when AI has correctly solved the Excel problem, its answer can be frustratingly long or in the wrong format. Tell it how you want the response to be structured: Give me the solution first. If you're providing a formula, put it in a code block so I can copy it. Then briefly explain how it works and give me any important limitations or things I should check. Keep the explanation [brief/detailed]. Adjust this depending on what you're doing. If you're learning, ask for a fuller explanation. If you're fixing a formula you understand, you may only want the corrected formula and a short explanation. Step 7: Build in a final check Catch obvious problems before you use the answer Even a carefully constructed prompt won't guarantee a correct answer. I've had AI produce formulas that worked perfectly on one example but failed on another. For important formulas, ask AI to consider edge cases before you use its solution: Before giving me the final solution, check that it meets all of my requirements and consider common edge cases such as blank cells, missing values, text-formatted numbers, duplicate values, and newly added rows. Explain any assumptions you've made. And if the answer is wrong, don't necessarily start over. Tell AI exactly what went wrong: The formula works for [example], but returns [error/result] when [specific situation]. Diagnose the problem and revise the solution while keeping [requirement] unchanged. Putting the pieces together worked AI covered everything I asked for After combining these seven steps into a single prompt, ChatGPT gave me exactly what I was looking for. It: Provided a formula that works. Took into account all my requirements and restrictions. Explained how the result works and why it chose this approach. Considered common edge cases. Explained its assumptions. Provided a solution that was ready to copy straight into my workbook. Build your prompt around the task You don't have to use every step for every Excel problem. For a simple formula question, you probably only need Steps 1, 2, and 6. A complicated workbook could benefit from all seven. The important thing is to give AI enough information to understand what you're working with, what you want, what it should avoid, and how you want the answer delivered. There's no perfect prompt—the right wording depends on the workbook, the task, and the AI tool you're using. The goal is to create a useful starting point that saves time rather than becoming another task to maintain.
AI prompts for Excel can take forever, so I built this 7-step shortcut
Full Article
Original Source
Read the full article at Howtogeek →KhanList aggregates and links to publicly available news content. We do not host full articles from third-party sources. Always verify important information with original sources.